Camera Flight Tool
![]() With the camera flight tool it is possible to create virtual camera flights in a VC Map App. Clicking on the icon activates the tool and opens the associated settings window, which can be used to create a new camera flight.
With the camera flight tool it is possible to create virtual camera flights in a VC Map App. Clicking on the icon activates the tool and opens the associated settings window, which can be used to create a new camera flight.
Create camera flight
Flight settings
The flight settings control general properties that affect the entire flight. The following settings are possible:
| Option | Description |
|---|---|
Interpolation |
Determines the connection between anchors of a flight. Linear represents the defined flight path as a straight line between two anchor points. Spline interpolates the defined flight path as a curve through the anchor points. To do this, at least 3 anchor points must be defined that are not positioned on a streight line. You can switch between interpolation settings while the flight is being played. 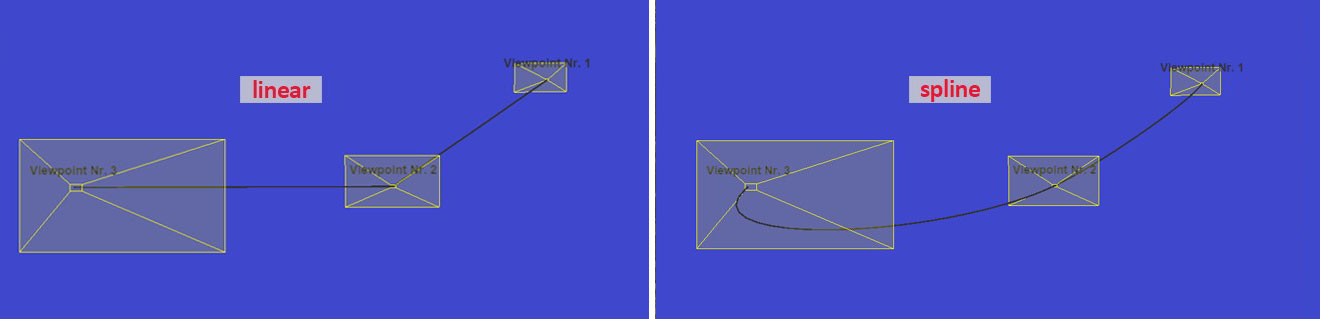
Figure 1. Illustration of the flight path with interpolation type "linear" (left) and "spline" (right)
|
Total flight duration |
The total flight duration is calculated automatically when a flight is created based on a defined standard speed and the distance traveled. The total flight time is given in seconds and can be changed afterwards. This has an effect on the runtime between the individual anchor points. |
Loop |
This option closes the flight by connecting the flight path from the last to the first anchor point so that the flight can be played in an uninterrupted loop. 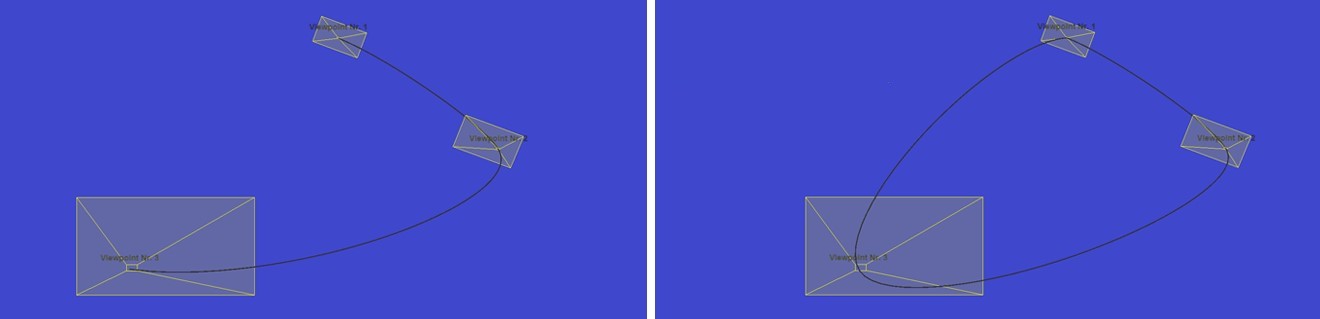
Figure 2. Display of the flight path without (left) and with "loop" option (right)
|
| If the defined trajectory is viewed from a suitable distance, the interpolation settings can be compared visually by switching between the options. |
Flight anchors
This area defines the individual views that are connected to form a flight path.
By clicking on ![]() , the visualization of the anchor points and the associated flight path is shown and hidden. This is also possible while the flight is being played.
, the visualization of the anchor points and the associated flight path is shown and hidden. This is also possible while the flight is being played.
The ![]() adds a new anchor point to the flight based on the current view. If there are several anchor points, an additional anchor can be inserted between two entries using
adds a new anchor point to the flight based on the current view. If there are several anchor points, an additional anchor can be inserted between two entries using ![]() . If, on the other hand, the icon at the end of the list is clicked, the flight is supplemented by an additional anchor point.
. If, on the other hand, the icon at the end of the list is clicked, the flight is supplemented by an additional anchor point.
The order of the anchor points can also be redefined using drag & drop. The interpolation of the flight path is automatically recalculated according to the new order.
If flight path visualization is activated, a set anchor is highlighted by colouring the view. This represents the camera view of the anchor point. As soon as the set view is exited, the complete geometry of the set anchor point becomes visible.
The respective flight duration to the next anchor point is displayed after the name of the anchor. This is calculated based on the distance to the next anchor and a standard speed. This time can be changed according to individual requirements. The total flight time is synchronized automatically.
Existing edit points can be edited via ![]() . The anchor editor opens in a separate window.
. The anchor editor opens in a separate window.
Via the ![]() menu at the end of each entry it is possible to
menu at the end of each entry it is possible to
-
jump to the corresponding view.
-
remove the view from the flight.
|
When the camera flight tool is opened, a temporary camera flight is created to which the settings made are applied. If the settings are to be discarded, the NEW button can be pressed to start again from the original state with new settings.
|
Anchor editor
In order to differentiate between defined anchor points, a default name is initially assigned to each one. To edit this and other properties of an already defined anchor, the anchor editor can be opened with ![]() Edit anchor.
Edit anchor.
Position & Orientation
The map view jumps to the selected anchor point when the anchor point editor is opened, as the position and orientation settings are automatically synchronized with the current view of the map by default. This is illustrated by the active icon ![]() . A click on the icon to deactivate this behavior.
. A click on the icon to deactivate this behavior.
If the synchronization of position & orientation is deactivated ![]() , the view of the map can be changed without having the values in the view settings of the anchor point automatically adapted to the view. If the current view is to be applied as the new setting for the anchor point in this mode, this can be done manually via
, the view of the map can be changed without having the values in the view settings of the anchor point automatically adapted to the view. If the current view is to be applied as the new setting for the anchor point in this mode, this can be done manually via ![]() .
.
Manual editing of the position & orientation values via the corresponding text fields is also only possible if synchronization is deactivated ![]() .
.
|
Apply accepts the changes made for the selected anchor point. Cancel resets the view to the original settings. |
Player
The player allows you to play the current camera flight. The time on the left-hand side of the slider indicates the current progress, the information on the right-hand side refers to the total duration.
| Action | ..UI | Shortcut |
|---|---|---|
Play/Pause |
|
This option will be available soon. |
Rewind/Forward |
|
This option will be available soon. |
Jump to last/next base position |
|
This option will be available soon. |
Record flight and download video |
|
This option is currently only available in the UI. |
| More information about the different options for the flight recording can be found at Record camera flight. |
Interaction with My Workspace
Each flight added to My Workspace is listed there in the Camera flights section. ![]() allows you to play the flight directly from there.
allows you to play the flight directly from there.
Via the ![]() menu at the end of each entry it is possible to
menu at the end of each entry it is possible to
-
edit the camera flight.
-
remove the camera flight from My Workspace.
-
jump to the extent of the camera flight.
-
export the flight configuration or the flight path.
-
record the flight in standard or high resolutions.
-
rename the camera flight.
Export camera flight
Click on one or more elements in My Workspace to select them. The selected elements can then be exported as GeoJSON via the ![]() menu of the Camera flights section. This allows the camera flights to be saved permanently beyond the current session or to be passed on to third parties.
menu of the Camera flights section. This allows the camera flights to be saved permanently beyond the current session or to be passed on to third parties.
|
The "Export flight path" option only exports the geometry of the created flight so that the flight path can be visualized in other applications. "Export flight", on the other hand, exports the entire flight configuration with VC Map-specific properties so that the flight can be imported back into the application at a later stage. This completely restores the configuration and can be used for further editing. |
Import camera flight
Exported flights can be imported again at any time using the saved GeoJSON file, e.g. to continue working with this element when visiting the VC Map App again. To do this, open My workspace. The import function is available in the ![]() menu of the Camera flights section. After selecting a valid GeoJSON file that contains a camera flight object, the entry is added to the area again. The flight is now available for playback or further editing.
menu of the Camera flights section. After selecting a valid GeoJSON file that contains a camera flight object, the entry is added to the area again. The flight is now available for playback or further editing.
Record camera flight
Two options are available for recording flights:
-
The Standard Quality option records at a bit rate of 12 Mbit/second (12 Mbps) and 30 frames per second (30 fps).
-
The High Quality option records at an increased bit rate of 18 Mbit/second (18 Mbps) and 30 frames per second (30 fps). This affects the file size, but can improve the display quality of the recording if the standard quality does not provide a satisfactory result.
Which option is suitable in each individual case can depend on various factors relating to the browser used, including codec support and browser configuration settings, all of which can affect handling of videos.
| In the Menu, the display setting of the map application can be set to “High” before recording - this also has a positive effect on the quality of the recording. |
During the recording of the camera flight, the VC Map application is locked for entries. A progress bar shows the current status of the recording. Once the recording is complete, the video is automatically downloaded to your local device in WEBM format. The recording can be stopped at any time by clicking “Cancel”.
| During recording, the browser window and the corresponding browser tab with the map application should remain open, otherwise the recording process will be paused. |