Internationalization
The Internationalization section configures translations. A translatable text is defined as a key-value pair. For all available languages, a key is assigned the respective translation as a value.
All keys configured in the Internationalization section are available as translatable items. Translatable items can be used to replace texts integrated in the application (user interface elements, headings, help texts, …) in the configuration so that they can be addressed by the language control.These text elements are thereby displayed in the VC Map by the language selected in the language setting.
| In order to use translatable items, the translation keys must be used in place of the static text in the respective element editor. This translation key is picked up in the internationalization editor that provides the respective translation per language. |
There are two ways to create translations in the Internationalization section:
-
Add Language is used to add all existing keys of translatable items at this point in time as entries. This option allows to perform a full translation of all items into a new language. This includes both, items of the user interface that are provided by default, and entries previously added via the internationalization editor for variable elements of the VC Map.
-
Add Entry is used to add translatable items for variable elements of the VC Map that are added during configuration. This applies, for example, to headlines, titles of layers, oblique imagery collections or viewpoints, or to contents of the feature info. Thus, attribute values of geodata consisting of alphanumeric codes can be translated into natural language for display in the feature info via the internationalization editor.
| The general actions for editing components are explained here. |
Add Language
With click on a new language can be added.
By default, two languages are available for the VC Map user interface: German (de) and English (en).
New languages can be added by taking the key-value pairs from an existing language and adjusting them. After adding the language entry, the internationalization editor opens to adjust the values accordingly.
The following parameters can be configured for internationalization:
General Settings
| Option | Description |
|---|---|
Name (ID) |
Unique name (identifier) for the internationalization entry. For new entries a default identifier is generated which can be renamed manually. For languages, the name corresponds to the name of the language. |
Language |
Selection of a language key whose translations can be displayed and edited under Entries. |
Entries
| Option | description |
|---|---|
Key |
Key of the element to translate. |
Translation |
Translation text in the current selected language. |
Add Entry
Clicking on adds a new entry and opens the internationalization editor.
Individual entries are suitable for all text elements that are added individually in the course of app configuration and are to be addressed by the language control equivalent to standard components of the user interface.
There is currently no strict syntax for the structure of a translation key. However, for the sake of unambiguous mapping and maintainability, it is recommended to adopt the following naming convention when defining the translation key:
<section>.<item> or <section>.<item>.<subitem>.
The following parameters can be configured for internationalization:
General Settings
| Option | Description |
|---|---|
Name (ID) |
Unique name (identifier) for the internationalization entry. For new entries a default identifier is generated which can be renamed manually. For languages, the name corresponds to the name of the language. |
Language |
Selection of a language key whose translations can be displayed and edited under Entries. |
Entries
| Option | description |
|---|---|
Key |
Key of the element to translate. |
Translation |
Translation text in the current selected language. |
Examples
Single Elements
Typical examples of individual entries of translations include headings, titles of layers or views, or help texts.
Following the recommended naming convention, here are some examples to define the associated translation keys:
example heading
app.headline
example layer title
layer.buildings.title
example layer tooltip
layer.buildings.tooltip
Codelists
Codelists for translating alphanumeric attribute values into natural language can be built by adding new entries. Here the principle for translating languages is applied to attribute values.
There is currently no strict syntax for building codelists. However, for the sake of unambiguous mapping and maintainability, it is recommended to use the following naming convention when defining a code list:
codeList.<attributeName>.<alphanumericCode> for translating attribute values.
and if necessary
codeList.<attributename>.attributeKey for the translation of attribute names.
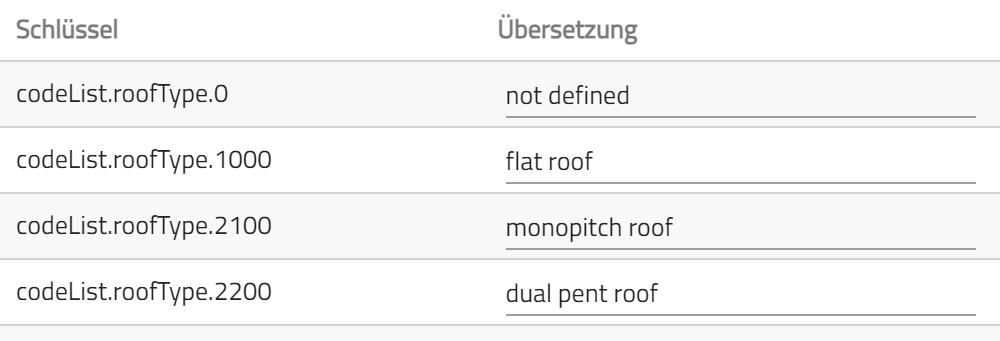
Example roof type in dot-notation

The dot notation is used to access the values of the respective key in the JSON object. In reverse, this means that the associated JSON object that maps this setting is created as a nested object, where the first key corresponds to the language key:
Example roof type as JSON-object
{
  "name": "codelistRoof",
  "de": {
    "codeList": {
      "roofType": {
        "0": "nicht definiert",
        "1000": "Flachdach",
        "2100": "Pultdach",
        "2200": "Versetztes Pultdach",
        "3100": "Satteldach",
        "3200": "Walmdach",
        "3300": "Krüppelwalmdach",
        "3400": "Mansardendach",
        "3500": "Zeltdach",
        "3600": "Kegeldach",
        "3700": "Kuppeldach",
        "3800": "Sheddach",
        "3900": "Bogendach",
        "4000": "Turmdach",
        "5000": "Mischform",
        "9999": "Sonstiges",
        "attributeKey": "Dachform"
      }
    }
  },
  "en": {
    "codeList": {
      "roofType": {
        "0": "not defined",
        "1000": "flat roof",
        "2100": "monopitch roof",
        "2200": "dual pent roof",
        "3100": "gabled roof",
        "3200": "hipped roof",
        "3300": "half-hipped roof",
        "3400": "mansard roof",
        "3500": "pavilion roof",
        "3600": "cone roof",
        "3700": "copula roof",
        "3800": "sawtooth roof ",
        "3900": "arch roof",
        "4000": "pyramidal broach roof",
        "5000": "combination of roof forms",
        "9999": "other",
        "attributeKey": "Roof Type"
      }
    }
  }
}| To apply a code list, in the Feature Info section for value mapping this defined syntax and a template string instead of the alphanumeric code has to be used, e.g. `codeList.<attribute name>.${value}`. |
| Apply applies the changes made to the displayed app. See also Editing and saving. |